Many music producers like to tune 808 kicks so that it matches the key of the song. This can help make 808 kicks to sit better in the mix.
For example, if the song is in the key of A major. The ideal approach is to tune the 808 kick drum in same key of the track.
However, not all 808 kicks may need to be tuned. A lot of times the perceived pitch of the 808 kick drum will be subjective.
So in other words, a music producer may like the sound of a particular 808 kick sample and will simply bypass the process of tuning the 808 kick sample.
▶ Step 1: Drag 808 kick sample to FL Studio Channel Rack ⯇
First and foremost drag your 808 kick sample to the channel rack in FL Studio.

Once you have dragged the 808 kick sample on to the FL Studio channel rack you wanna assign the 808 kick sample to a free mixer track. To do that you click on the 808's channel selector and open up FL Studio's Mixer by pressing the shortcut key "F9".
When FL Studio's mixer pops up you have to choose which mixer track to assign your 808 sample. On that note, you can simply assign the 808 kick sample by using the shortcut key "CTRL+L" in FL Studio.
In addition, it is advised that you assign the 808 sample to a free mixer track of your choice. This allows the 808 sample to be processed on its own when using third-party VST audio plugins.
▶ Step 2: Launch 808 kick sample Channel Settings ⯇
To tune 808 kicks you have to figure out which key the 808 sample is in. You can find the pitch of the 808 by using Edison which is an audio editor plugin which comes by default in FL Studio.
So to do that you left-click on the 808 kick sample on the channel rack of the project. This will bring up the Channel settings window of the 808 kick sample.
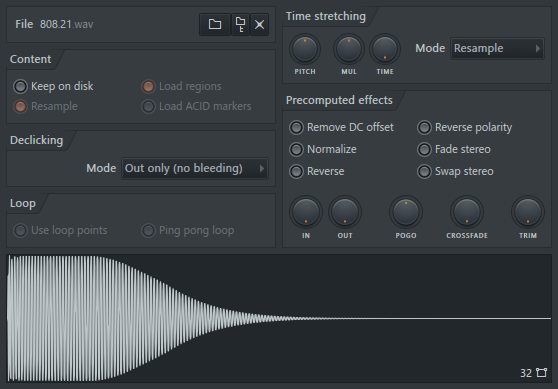
▶ Step 3: Select EDIT from Sample View of 808 kick sample Channel Settings
After you have opened up the channel settings of the 808 kick sample. You have to right-click on sample view of 808 kick sample and have access to a menu with additional commands.
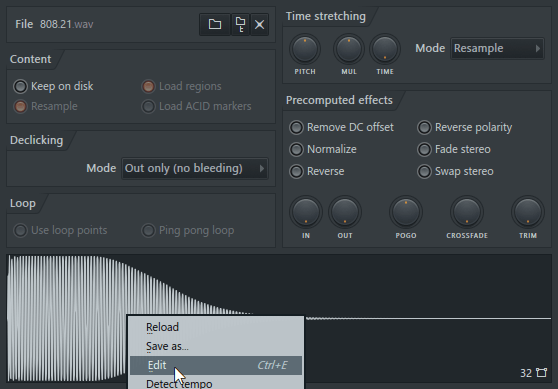
The next step will be to edit the 808 sample with Edison by clicking on the Edit menu or by using CRTL-E which is a short-cut key to open up Edison wave editor.
▶ Step 4: Open Edison to edit the 808 kick sample
Once Edison wave editor is open it will show the waveform of the 808 kick sample. The waveform of the 808 kick sample also highlights its loudness over time showing a gentle fade.
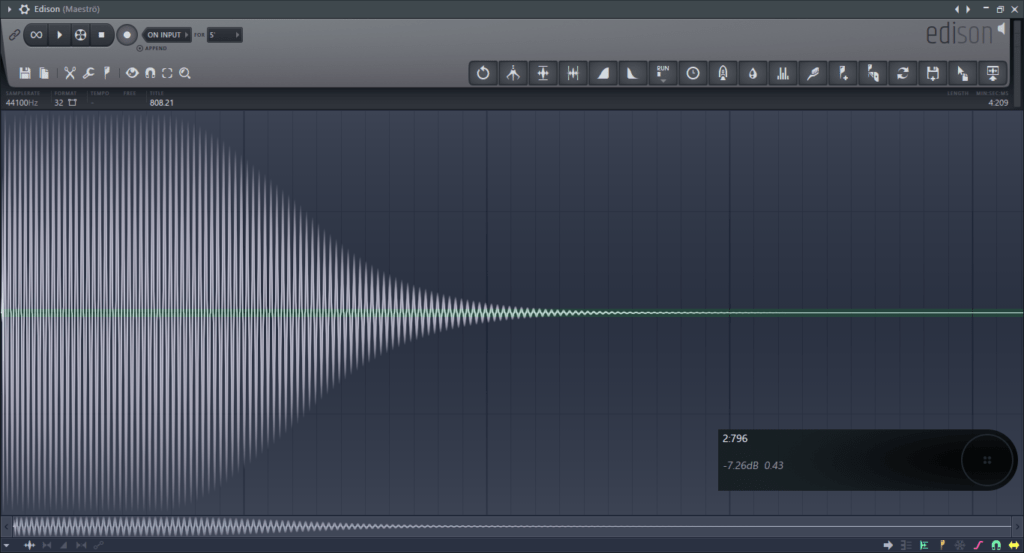
The fading sound of the 808 kick sample can be modified by tweaking the release time. In essence a longer release time means the 808 kick sample will have a much longer fading sound.
▶ Step 5: Detect Pitch Regions with Edison in FL Studio
In Edison wave editor the option to detect pitch regions is more than useful. This feature of detecting pitch regions allows you to know the pitch of an 808 kick sample.
To access this option of detecting pitch regions in FL Studio you must have Edison open. After that you click on the Regions icon of Edison wave editor.

The "Region's icon" is located next to the Tools icon which is a wrench on the Edison wave editor. Once the Regions icon is clicked it will show a drop down menu and you then have to click on the "Detect pitch regions" option.
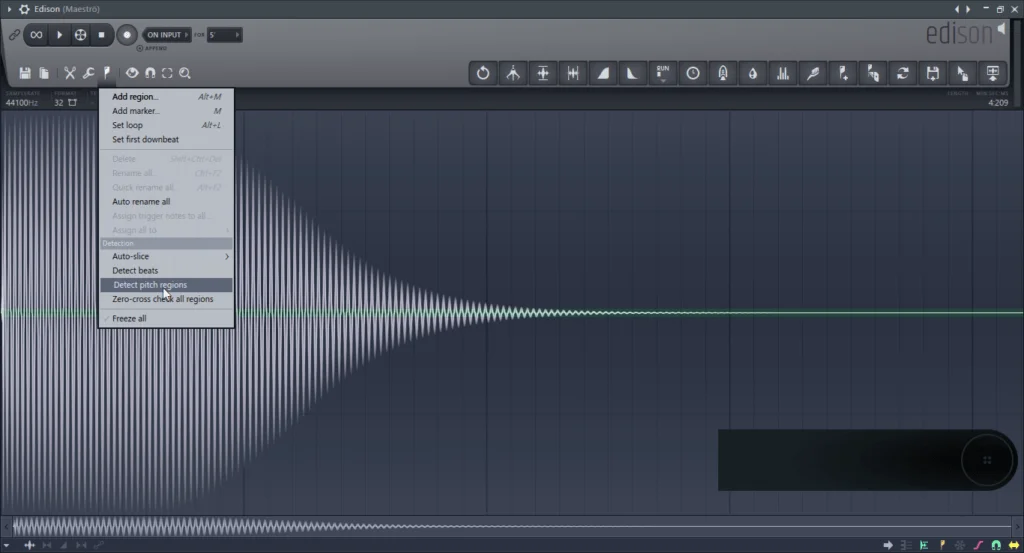
▶ Step 6: Detected Pitch Regions of 808 kick Sample
Each 808 kick sample will have a certain pitch in which it will be tuned to. Therefore once the pitch regions are detected you will know the pitch of the 808 kick sample.
In this scenario the Edison wave editor in FL Studio shows that the 808 kick sample starts of with a pitch of F#2. Eventually the 808 kick sample goes down two half-steps to E2.
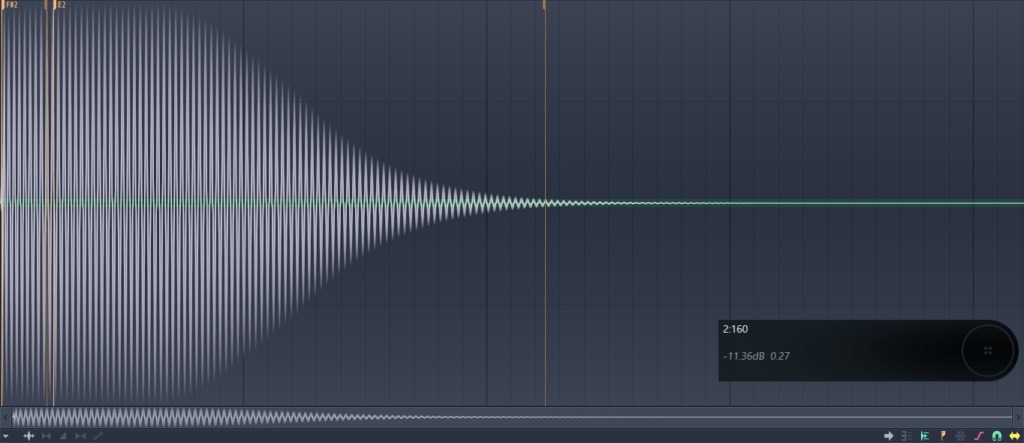
However, since the pitch of E2 in this instance has a long duration. It means the best approach is to tune the 808 kick drum to a pitch of E2 rather than the pitch of F#2 which it starts off with.
So the rule of thumb is to always try to tune 808 kicks to a pitch which has a longer duration. Sometimes this might not work hence discretion is strongly advised in those instances.
▶ Step 7: Channel Sampler Envelope Settings Page
Once you have detected the pitch of the 808 kick sample you have to set it to the correct pitch. To set the 808 kick sample to the correct you have to open the channel window of the 808 kick sample.
After you open the channel window of the 808 kick sample. You have to navigate to the Envelope Settings page of the channel sampler settings.
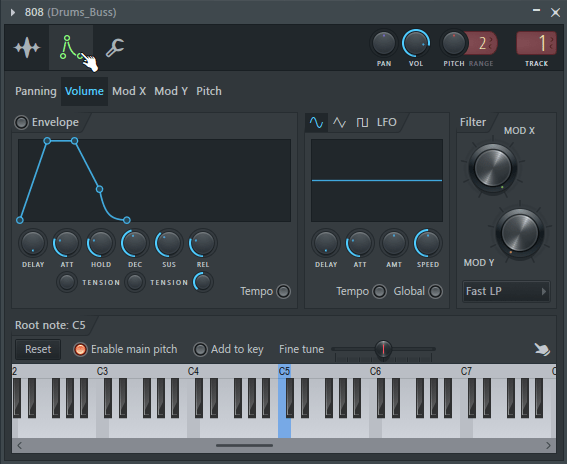
Below the Envelope settings page there is a preview keyboard. If you left-click the preview keyboard this will audition the sample in question.
If you right-click on the preview keyboard this will change the default root note of the sample. Keep in mind that each sample loaded will have a natural pitch of it's own.
By default the root note of the channel in FL Studio will be highlighted with a blue color. Futhermore, the default root key for the channel sampler is always assigned to C5.
In addition C5 is middle C in FL Studio while in other DAWS middle C is assigned to C3. So if you press middle C on your midi keyboard it will play C5 in FL Studio.
In other DAWS if you press middle C on your midi keyboard it will play C3 and that's the difference between FL Studio and other DAWS.
▶ Step 8: Tune 808 kick sample to detected pitch region
Since we have detected the pitch of 808 kick sample to be E2 we have to set it to that root note. This is how you tune 808 kicks to the their correct pitch in FL Studio.
So to change the root note of the channel sampler just right-click on the preview keyboard to the desired root key. In this instance we will right-click on E4 which is 8 half-steps below the C5.

When this is done it means the 808 kick sample will be tuned to the note of E4. But it's always good to verify if the 808 kick sample will be playing the right notes from the piano roll.
For example if you have the note C4 in the piano roll the 808 kick sample should also be playing C4 if it's tuned properly.
To confirm that the 808 kick sample is playing the right notes this can be done using an audio tuning plugin. Some of the plugins which have a tuner are "Native-Instruments Guitar Rig VST" and "IK Multimedia Amplitube VST".
▶ Step 9: Verify if the 808 kick sample is now in tune
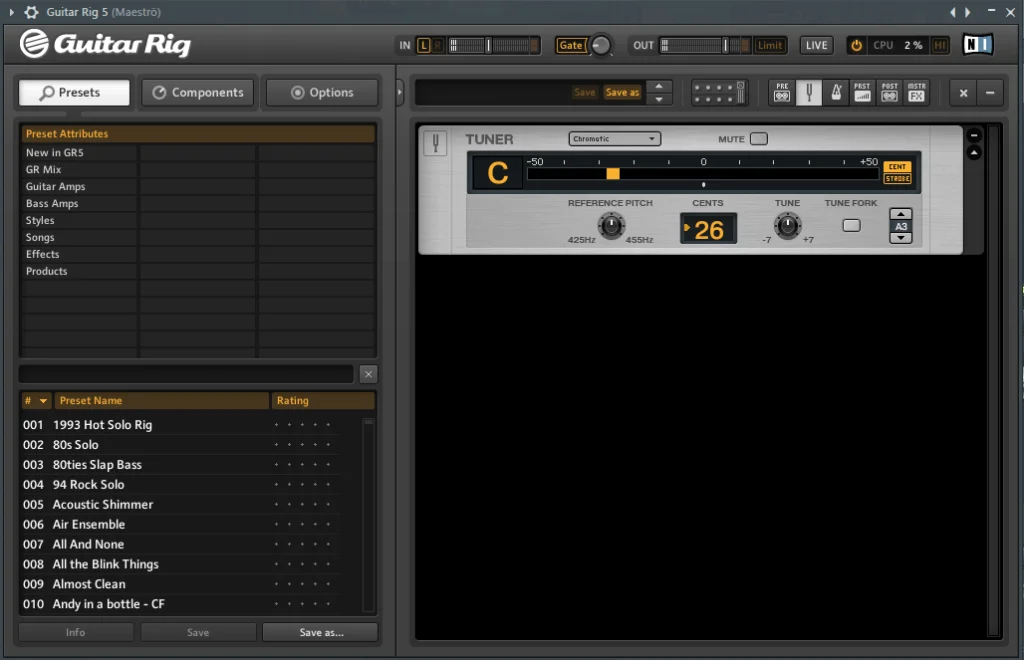
Now load up Native-Instruments Guitar Rig or any third-party tuning plugin you have. The idea is to observe if the 808 kick sample will play the right notes in key.
So when you press C5 in FL Studio it should show the note C on the Tuner to confirm that the 808 kick has been tuned properly.
You May Also Like:
For example, if the song is in the key of A major. The ideal approach is to tune the 808 kick drum in same key of the track.
However, not all 808 kicks may need to be tuned. A lot of times the perceived pitch of the 808 kick drum will be subjective.
So in other words, a music producer may like the sound of a particular 808 kick sample and will simply bypass the process of tuning the 808 kick sample.
▶ Step 1: Drag 808 kick sample to FL Studio Channel Rack ⯇
First and foremost drag your 808 kick sample to the channel rack in FL Studio.
Once you have dragged the 808 kick sample on to the FL Studio channel rack you wanna assign the 808 kick sample to a free mixer track. To do that you click on the 808's channel selector and open up FL Studio's Mixer by pressing the shortcut key "F9".
When FL Studio's mixer pops up you have to choose which mixer track to assign your 808 sample. On that note, you can simply assign the 808 kick sample by using the shortcut key "CTRL+L" in FL Studio.
In addition, it is advised that you assign the 808 sample to a free mixer track of your choice. This allows the 808 sample to be processed on its own when using third-party VST audio plugins.
▶ Step 2: Launch 808 kick sample Channel Settings ⯇
To tune 808 kicks you have to figure out which key the 808 sample is in. You can find the pitch of the 808 by using Edison which is an audio editor plugin which comes by default in FL Studio.
So to do that you left-click on the 808 kick sample on the channel rack of the project. This will bring up the Channel settings window of the 808 kick sample.
▶ Step 3: Select EDIT from Sample View of 808 kick sample Channel Settings
After you have opened up the channel settings of the 808 kick sample. You have to right-click on sample view of 808 kick sample and have access to a menu with additional commands.
The next step will be to edit the 808 sample with Edison by clicking on the Edit menu or by using CRTL-E which is a short-cut key to open up Edison wave editor.
▶ Step 4: Open Edison to edit the 808 kick sample
Once Edison wave editor is open it will show the waveform of the 808 kick sample. The waveform of the 808 kick sample also highlights its loudness over time showing a gentle fade.
The fading sound of the 808 kick sample can be modified by tweaking the release time. In essence a longer release time means the 808 kick sample will have a much longer fading sound.
▶ Step 5: Detect Pitch Regions with Edison in FL Studio
In Edison wave editor the option to detect pitch regions is more than useful. This feature of detecting pitch regions allows you to know the pitch of an 808 kick sample.
To access this option of detecting pitch regions in FL Studio you must have Edison open. After that you click on the Regions icon of Edison wave editor.
The "Region's icon" is located next to the Tools icon which is a wrench on the Edison wave editor. Once the Regions icon is clicked it will show a drop down menu and you then have to click on the "Detect pitch regions" option.
▶ Step 6: Detected Pitch Regions of 808 kick Sample
Each 808 kick sample will have a certain pitch in which it will be tuned to. Therefore once the pitch regions are detected you will know the pitch of the 808 kick sample.
In this scenario the Edison wave editor in FL Studio shows that the 808 kick sample starts of with a pitch of F#2. Eventually the 808 kick sample goes down two half-steps to E2.
However, since the pitch of E2 in this instance has a long duration. It means the best approach is to tune the 808 kick drum to a pitch of E2 rather than the pitch of F#2 which it starts off with.
So the rule of thumb is to always try to tune 808 kicks to a pitch which has a longer duration. Sometimes this might not work hence discretion is strongly advised in those instances.
▶ Step 7: Channel Sampler Envelope Settings Page
Once you have detected the pitch of the 808 kick sample you have to set it to the correct pitch. To set the 808 kick sample to the correct you have to open the channel window of the 808 kick sample.
After you open the channel window of the 808 kick sample. You have to navigate to the Envelope Settings page of the channel sampler settings.
Below the Envelope settings page there is a preview keyboard. If you left-click the preview keyboard this will audition the sample in question.
If you right-click on the preview keyboard this will change the default root note of the sample. Keep in mind that each sample loaded will have a natural pitch of it's own.
By default the root note of the channel in FL Studio will be highlighted with a blue color. Futhermore, the default root key for the channel sampler is always assigned to C5.
In addition C5 is middle C in FL Studio while in other DAWS middle C is assigned to C3. So if you press middle C on your midi keyboard it will play C5 in FL Studio.
In other DAWS if you press middle C on your midi keyboard it will play C3 and that's the difference between FL Studio and other DAWS.
▶ Step 8: Tune 808 kick sample to detected pitch region
Since we have detected the pitch of 808 kick sample to be E2 we have to set it to that root note. This is how you tune 808 kicks to the their correct pitch in FL Studio.
So to change the root note of the channel sampler just right-click on the preview keyboard to the desired root key. In this instance we will right-click on E4 which is 8 half-steps below the C5.
When this is done it means the 808 kick sample will be tuned to the note of E4. But it's always good to verify if the 808 kick sample will be playing the right notes from the piano roll.
For example if you have the note C4 in the piano roll the 808 kick sample should also be playing C4 if it's tuned properly.
To confirm that the 808 kick sample is playing the right notes this can be done using an audio tuning plugin. Some of the plugins which have a tuner are "Native-Instruments Guitar Rig VST" and "IK Multimedia Amplitube VST".
▶ Step 9: Verify if the 808 kick sample is now in tune
Now load up Native-Instruments Guitar Rig or any third-party tuning plugin you have. The idea is to observe if the 808 kick sample will play the right notes in key.
So when you press C5 in FL Studio it should show the note C on the Tuner to confirm that the 808 kick has been tuned properly.
You May Also Like:
