DMX512-A carries digital control data to lighting equipment, while Ableton Live can automate software parameters directly on a song timeline. This combination is what makes Ableton Live DMX lighting useful for solo performers who want repeatable cues without running a separate lighting desk.
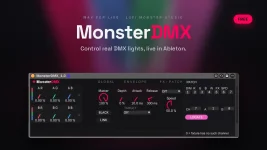
A direct setup keeps the lighting control inside Live. The MonsterDMX device for Ableton Live is one example, using a Max for Live device to drive a uDMX interface and up to two RGB(W) fixtures while exposing the controls to automation and MIDI mapping.
Ableton Link solves a different problem. It can keep compatible software in musical time, but it does not carry DMX values or ordinary MIDI note and Control Change data between applications. If your plan depends on Ableton Live MIDI-to-DMX messages, you still need a MIDI route, a direct Max device, or lighting software that receives those messages.
A separate lighting application makes more sense once the show outgrows a small PAR setup. Live can send MIDI cues to another program, or Link can keep a compatible program synchronized while it handles fixture libraries, larger patches, and more complex scenes. Steinberg takes the integrated-show route too, with VST Live 3 DMX controls alongside audio and video features.
Working out what DMX controller you need often ends with a compatible USB-DMX interface rather than a physical console. You can run DMX without a controller console, but something electrical still has to sit between the computer and the lighting cable. A USB-DMX adapter fills that role, while the software decides what values each fixture receives.
Before buying anything, check the adapter model, driver support, and fixture modes named by the software you plan to use. A cheap interface saves nothing if the control path cannot open it reliably or the required driver is unavailable for your computer.
Every fixture mode has a channel footprint. If a light uses seven consecutive channels and starts at address 1, the next independent seven-channel fixture can start at address 8 without overlapping it. Starting the second fixture inside the first footprint makes both respond to some of the same data, which can look like broken software even when the Ableton Live lighting setup is sending exactly what you programmed.
Channel order is another trap. Cheap PARs do not always arrange dimmer, red, green, blue, white, strobe, and built-in effects in the same sequence. A useful DMX with Ableton workflow starts by setting one fixture to a known mode, confirming its start address, then moving one software control at a time. If red changes blue, fix the channel map before touching automation.
MIDI mapping is better for decisions you want to make onstage. A pad can handle blackout, a fader can ride the master dimmer, and a knob can change an effect rate without reaching for the mouse. The same distinction matters in any DMX live performance rig because preset-style actions and continuously moving parameters are different jobs.
A reliable show needs a manual escape route even when every cue is automated. Keep blackout reachable, test the complete set with the real USB interface and fixtures, and verify what happens after stopping or restarting playback. The logic behind MIDI automation on a song timeline applies here too, since automation is useful only when a missed cue does not leave the performer trapped in the wrong state.
A direct setup keeps the lighting control inside Live. The MonsterDMX device for Ableton Live is one example, using a Max for Live device to drive a uDMX interface and up to two RGB(W) fixtures while exposing the controls to automation and MIDI mapping.
Ableton Link solves a different problem. It can keep compatible software in musical time, but it does not carry DMX values or ordinary MIDI note and Control Change data between applications. If your plan depends on Ableton Live MIDI-to-DMX messages, you still need a MIDI route, a direct Max device, or lighting software that receives those messages.
Pick the control path before buying hardware
The simplest Ableton to DMX path is a device that talks to the USB-DMX interface directly. Max for Live DMX control keeps color, dimmer, blackout, and reactive controls in the same Set as the music, so an Ableton Live DMX plugin can behave much like another automated device. The current MonsterDMX release is listed for Windows 10 and 11 with Live 11 or 12 and Max for Live, so Mac users need a different route.A separate lighting application makes more sense once the show outgrows a small PAR setup. Live can send MIDI cues to another program, or Link can keep a compatible program synchronized while it handles fixture libraries, larger patches, and more complex scenes. Steinberg takes the integrated-show route too, with VST Live 3 DMX controls alongside audio and video features.
Working out what DMX controller you need often ends with a compatible USB-DMX interface rather than a physical console. You can run DMX without a controller console, but something electrical still has to sit between the computer and the lighting cable. A USB-DMX adapter fills that role, while the software decides what values each fixture receives.
Before buying anything, check the adapter model, driver support, and fixture modes named by the software you plan to use. A cheap interface saves nothing if the control path cannot open it reliably or the required driver is unavailable for your computer.
Fixture addresses matter more than the software
Once you understand how DMX lighting works, most setup failures become less mysterious. The DMX512-A control standard defines the digital link between controllers and lighting equipment, but each fixture still decides what its individual channels mean. Red might live on one channel in one PAR and somewhere else in another mode or model.Every fixture mode has a channel footprint. If a light uses seven consecutive channels and starts at address 1, the next independent seven-channel fixture can start at address 8 without overlapping it. Starting the second fixture inside the first footprint makes both respond to some of the same data, which can look like broken software even when the Ableton Live lighting setup is sending exactly what you programmed.
Channel order is another trap. Cheap PARs do not always arrange dimmer, red, green, blue, white, strobe, and built-in effects in the same sequence. A useful DMX with Ableton workflow starts by setting one fixture to a known mode, confirming its start address, then moving one software control at a time. If red changes blue, fix the channel map before touching automation.
Automation should still leave you a way out
The cleanest way to connect DMX lights to music is to separate deliberate cues from reactive movement. Arrangement automation works well for exact color changes and blackouts tied to song sections, while an audio follower can handle brightness movement from drums or another rhythmic track. If you improvise in Session View, recording a Session performance into Arrangement can preserve device moves for later editing.MIDI mapping is better for decisions you want to make onstage. A pad can handle blackout, a fader can ride the master dimmer, and a knob can change an effect rate without reaching for the mouse. The same distinction matters in any DMX live performance rig because preset-style actions and continuously moving parameters are different jobs.
A reliable show needs a manual escape route even when every cue is automated. Keep blackout reachable, test the complete set with the real USB interface and fixtures, and verify what happens after stopping or restarting playback. The logic behind MIDI automation on a song timeline applies here too, since automation is useful only when a missed cue does not leave the performer trapped in the wrong state.