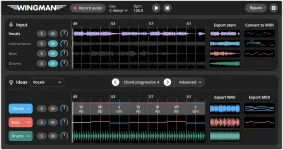
Wingman 3.0 runs inside a DAW, listens to track audio, and can return chord, bass, drum, and guitar ideas around the material it hears.
The useful bit is not hitting Generate until something sounds clever. A practical Mixed In Key workflow starts by deciding what the plugin should listen to. Use the clearest part that carries the musical information you care about, then judge suggestions against the original audio instead of in isolation.
The Wingman 3.0 release adds genre-focused drums, guitar parts, and deeper chord editing. Those extras make the plugin broader, but the basic job stays focused. Give it musical context, keep the promising output, and move editable parts back into the session before you overwork them inside the plugin.
If you are figuring out how to install Mixed In Key Wingman, treat it like a normal plug-in. VST3, AU, and AAX are different host formats, so install what your DAW actually loads and scan it if necessary. The broader lesson from VST3 and AU format compatibility is simple. Having several formats available does not mean every host uses the same one.
For the Wingman plugin in FL Studio, the Wingman plugin in Ableton Live, or the Wingman plugin in Logic Pro, keep the first test boring. Use a short section with obvious pitch and rhythm, confirm Wingman hears the intended track, then generate one type of part. Changing the source, rhythm, chord editing, and sound all at once makes a bad result harder to diagnose.
Mixed In Key Wingman on Windows and Mixed In Key Wingman on Mac follow the same musical logic even when the loaded plug-in format differs. Start with routing and source choice before touching deeper controls. Most setup confusion looks technical, but a poor source can also make a correctly loaded plug-in feel useless.
Audio-to-MIDI deserves the same caution. Conversion gives you material to edit, not a perfect recreation of a performance. Audio-to-MIDI editing can still need cleanup around note lengths, timing, velocities, and extra detections. If a Wingman result has the right musical shape but feels stiff, fix the notes before deciding the idea itself is bad.
Bass suggestions need another sanity check. A note can sit inside the song's key and still pull against the chord sounding at that moment. The practical lesson behind writing bass against changing chords is to judge each low note against the active harmony, not just the scale. One awkward Wingman bass note may only need moving or shortening.
Using another instrument after generation can make this clearer. Routing generated MIDI to another instrument separates note choice from tone choice, which helps when a bass patch or chord sound makes a decent phrase seem worse than it is. Keep MIDI while the arrangement is moving. Commit to audio when the sound itself is worth preserving.
Drums and guitars deserve the same restraint. A drum suggestion can give you a groove direction without becoming the final drum production, while a guitar part can fill a harmonic role before you decide how exposed it should be. Generated layers are raw arrangement material, not instructions to fill every available space.
Wingman plugin system requirements matter less than session discipline until the computer starts struggling. If playback behaves badly, simplify the test before blaming the musical engine. Bypass unrelated processing, confirm the right plug-in format is loaded, and check whether the problem follows Wingman or the whole session.
A clean Mixed In Key workflow ends by exporting useful material before endless variation hunting sets in. Keep the chord progression that supports the vocal, the bassline with the right movement, or the drum pattern that gives the section direction. Back in the DAW, ordinary editing is usually faster than asking the generator to solve a problem you can already hear.
The useful bit is not hitting Generate until something sounds clever. A practical Mixed In Key workflow starts by deciding what the plugin should listen to. Use the clearest part that carries the musical information you care about, then judge suggestions against the original audio instead of in isolation.
The Wingman 3.0 release adds genre-focused drums, guitar parts, and deeper chord editing. Those extras make the plugin broader, but the basic job stays focused. Give it musical context, keep the promising output, and move editable parts back into the session before you overwork them inside the plugin.
Start with the smallest useful piece of audio
Using Mixed In Key Wingman is easier when the source has a clear role. A vocal can steer harmony, a loop can provide rhythm and tonal clues, and a bass-heavy section can change what feels convincing lower in the arrangement. Dense passages give you more information, but they also make it harder to hear why one suggestion works and another misses.If you are figuring out how to install Mixed In Key Wingman, treat it like a normal plug-in. VST3, AU, and AAX are different host formats, so install what your DAW actually loads and scan it if necessary. The broader lesson from VST3 and AU format compatibility is simple. Having several formats available does not mean every host uses the same one.
For the Wingman plugin in FL Studio, the Wingman plugin in Ableton Live, or the Wingman plugin in Logic Pro, keep the first test boring. Use a short section with obvious pitch and rhythm, confirm Wingman hears the intended track, then generate one type of part. Changing the source, rhythm, chord editing, and sound all at once makes a bad result harder to diagnose.
Mixed In Key Wingman on Windows and Mixed In Key Wingman on Mac follow the same musical logic even when the loaded plug-in format differs. Start with routing and source choice before touching deeper controls. Most setup confusion looks technical, but a poor source can also make a correctly loaded plug-in feel useless.
Keep generated parts editable until the idea survives
The most useful distinction in any Wingman plugin tutorial is MIDI versus audio. MIDI keeps note events available for revision, so you can change voicing, register, rhythm, or instrumentation later. An editable MIDI harmony workflow is valuable for the same reason. The musical decision stays separate from the sound playing it.Audio-to-MIDI deserves the same caution. Conversion gives you material to edit, not a perfect recreation of a performance. Audio-to-MIDI editing can still need cleanup around note lengths, timing, velocities, and extra detections. If a Wingman result has the right musical shape but feels stiff, fix the notes before deciding the idea itself is bad.
Bass suggestions need another sanity check. A note can sit inside the song's key and still pull against the chord sounding at that moment. The practical lesson behind writing bass against changing chords is to judge each low note against the active harmony, not just the scale. One awkward Wingman bass note may only need moving or shortening.
Using another instrument after generation can make this clearer. Routing generated MIDI to another instrument separates note choice from tone choice, which helps when a bass patch or chord sound makes a decent phrase seem worse than it is. Keep MIDI while the arrangement is moving. Commit to audio when the sound itself is worth preserving.
Version 3 controls matter after the first good idea
The Mixed In Key Wingman VST workflow gets more useful once a decent progression appears. Deeper chord editing lets you repair the harmonic idea instead of throwing away a mostly good result. Keep the bar that works, adjust the weak spot, then listen again with the source. Regenerating everything can erase the part you already liked.Drums and guitars deserve the same restraint. A drum suggestion can give you a groove direction without becoming the final drum production, while a guitar part can fill a harmonic role before you decide how exposed it should be. Generated layers are raw arrangement material, not instructions to fill every available space.
Wingman plugin system requirements matter less than session discipline until the computer starts struggling. If playback behaves badly, simplify the test before blaming the musical engine. Bypass unrelated processing, confirm the right plug-in format is loaded, and check whether the problem follows Wingman or the whole session.
A clean Mixed In Key workflow ends by exporting useful material before endless variation hunting sets in. Keep the chord progression that supports the vocal, the bassline with the right movement, or the drum pattern that gives the section direction. Back in the DAW, ordinary editing is usually faster than asking the generator to solve a problem you can already hear.