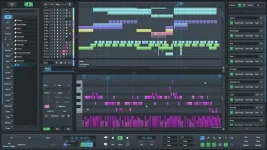
SoundBridge 3.2.0 now supports ten interface languages and adds revised track controls directly inside the Sequencer. A useful SoundBridge tutorial for beginners should start with the current interface, because older walkthroughs still rank and often show earlier layouts. If you need to download SoundBridge, use the official Windows or macOS build and finish authorization before opening a serious project.
The quickest way to learn how to use SoundBridge is to make something tiny first, not load a monster template. Create one audio track, one MIDI track, one Return track, and a short loop, but open Preferences before any of them. A clean first setup saves you from wondering whether a silent track is an arrangement problem or simply an input, driver, controller, or plug-in problem.
SoundBridge 3.2 also lets you change the interface and built-in tutorial language under Preferences > Global. If the pointer feels tiny on a high-resolution display, cursor scale now lives under Preferences > GUI.
For a MIDI keyboard in SoundBridge, connect it before launching the DAW, enable it under Preferences > MIDI, then select it as the input on a MIDI track. MIDI instruments in SoundBridge can come from a VST instrument or the built-in Sampler, so you do not need a huge instrument collection just to test note input. Play a few notes and make sure the track reacts before building anything elaborate.
VST plugins in SoundBridge are managed through Plugin Locations. Add the directory containing the plug-in, refresh the plug-in list, then load the instrument or effect from the browser into the Insert Rack. Adding an instrument in SoundBridge is basically drag, load, play, and troubleshoot only if the plug-in fails to appear.
Recording audio in SoundBridge starts by choosing the correct hardware input, arming the Audio track, setting monitoring appropriately, and using the transport to record. Do one clean pass before stacking takes or effects. If the waveform appears but playback is silent, check routing and the selected output before rebuilding the track or reinstalling anything.
On the MIDI side, record a basic part and open the MIDI Editor only when there is something worth fixing. Notes, velocity, and controller data can be edited there, while audio clips open in the Audio Editor for jobs such as fades, gain changes, pitch work, and time stretching. The point is to learn where each job lives rather than trying every tool during the first ten minutes.
Once the core loop works, the SoundBridge 3.2.0 workflow changes become useful instead of abstract release notes. Resizable tracks, the revised gain controls, cursor scaling, and movable special tracks are small changes, but they matter when the Sequencer starts getting crowded.
Automation in SoundBridge is easier to understand after the static mix makes sense. Set rough gain and pan first, then automate only the parameter that actually needs movement. A first project does not need ten lanes of automation to prove the feature works.
Remote collaboration can wait until local playback and recording behave properly. End-to-end delay is a major quality factor in networked musical performance, which is why audio delay in network music performance matters when a remote session feels disconnected. SoundBridge 3.2 adds webcam self-preview and smoother collaboration setup, but stable local audio remains the sensible baseline.
When the arrangement is ready, export from SoundBridge instead of adding another round of unnecessary processing. Keep the first finished file, reopen the project, and confirm it still plays as expected. By then, the built-in SoundBridge manual and tutorial material become reference tools rather than a substitute for actually making something.
The quickest way to learn how to use SoundBridge is to make something tiny first, not load a monster template. Create one audio track, one MIDI track, one Return track, and a short loop, but open Preferences before any of them. A clean first setup saves you from wondering whether a silent track is an arrangement problem or simply an input, driver, controller, or plug-in problem.
SoundBridge 3.2 also lets you change the interface and built-in tutorial language under Preferences > Global. If the pointer feels tiny on a high-resolution display, cursor scale now lives under Preferences > GUI.
Set up audio, MIDI and plug-ins first
Press P to open Preferences and sort out audio before touching the timeline. SoundBridge currently lists ASIO-compatible audio hardware in its Windows requirements, while Core Audio-compliant hardware is recommended on macOS. Choose the input and output you actually use, then pick a buffer that stays responsive without turning CPU use into a guessing game.For a MIDI keyboard in SoundBridge, connect it before launching the DAW, enable it under Preferences > MIDI, then select it as the input on a MIDI track. MIDI instruments in SoundBridge can come from a VST instrument or the built-in Sampler, so you do not need a huge instrument collection just to test note input. Play a few notes and make sure the track reacts before building anything elaborate.
VST plugins in SoundBridge are managed through Plugin Locations. Add the directory containing the plug-in, refresh the plug-in list, then load the instrument or effect from the browser into the Insert Rack. Adding an instrument in SoundBridge is basically drag, load, play, and troubleshoot only if the plug-in fails to appear.
Build the project in the Sequencer
Keep the first project simple in the SoundBridge Sequencer. Use the plus control in the Track List to create Audio, MIDI, or Return tracks, then name them immediately. SoundBridge 3.2 also puts Pre-Gain, Pan, and Gain controls directly on more track types, so basic level moves no longer require bouncing between as many views.Recording audio in SoundBridge starts by choosing the correct hardware input, arming the Audio track, setting monitoring appropriately, and using the transport to record. Do one clean pass before stacking takes or effects. If the waveform appears but playback is silent, check routing and the selected output before rebuilding the track or reinstalling anything.
On the MIDI side, record a basic part and open the MIDI Editor only when there is something worth fixing. Notes, velocity, and controller data can be edited there, while audio clips open in the Audio Editor for jobs such as fades, gain changes, pitch work, and time stretching. The point is to learn where each job lives rather than trying every tool during the first ten minutes.
Once the core loop works, the SoundBridge 3.2.0 workflow changes become useful instead of abstract release notes. Resizable tracks, the revised gain controls, cursor scaling, and movable special tracks are small changes, but they matter when the Sequencer starts getting crowded.
Mix, automate and export without overcomplicating it
Effects in SoundBridge can sit in the Insert Rack, while Return tracks handle shared processing such as a common reverb or delay. Flip between the Sequencer and Mixer when you need more room rather than leaving every panel open. Group tracks can also combine routing and project organization, which is handy once a few related tracks need to move together.Automation in SoundBridge is easier to understand after the static mix makes sense. Set rough gain and pan first, then automate only the parameter that actually needs movement. A first project does not need ten lanes of automation to prove the feature works.
Remote collaboration can wait until local playback and recording behave properly. End-to-end delay is a major quality factor in networked musical performance, which is why audio delay in network music performance matters when a remote session feels disconnected. SoundBridge 3.2 adds webcam self-preview and smoother collaboration setup, but stable local audio remains the sensible baseline.
When the arrangement is ready, export from SoundBridge instead of adding another round of unnecessary processing. Keep the first finished file, reopen the project, and confirm it still plays as expected. By then, the built-in SoundBridge manual and tutorial material become reference tools rather than a substitute for actually making something.