Final Cut Pro's automatic library backups save the editing database, but they do not include your original video files. An edit can reopen while its footage is still sitting on the drive you're about to wipe.
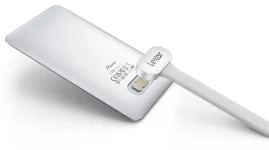
Apple tells you to reformat external storage before every 4K120 ProRes recording session. Footage imported from a Lexar Muse recording drive may still exist only on that SSD.
Keep the originals elsewhere, confirm Final Cut uses those copies, and make a separate backup before reformatting. A successful import, by itself, doesn't establish any of those things.
Even choosing Copy to Library needs a location check. Copies placed on the same recording SSD disappear along with the source files when you erase that device, regardless of their folder names.
The recording drive and the library drive also have different formatting requirements. Apple's Camera app requires exFAT for external ProRes recording, while Apple specifies APFS for an external drive holding a Final Cut library.
Keep the library on your Mac or a separate, appropriately formatted editing drive. Reformatting the capture SSD to suit Final Cut's library storage would conflict with the Camera app's recording requirement.
Don't stop at the new destination name. The change applies to future imports, while existing source files stay where they were. Choose File, then Consolidate Library Media, and include original media in the transfer.
Choose the whole library when you need unused takes as well as the clips in the finished project. Selecting one project limits the operation to that project's media.
A "nothing to consolidate" message isn't proof that the SSD is ready to erase. It means the media is already gathered in one location. You still have to check which device holds it.
The storage-use breakdown in Library Properties lists the devices holding original, optimized, and proxy media. If originals still appear under the capture drive, Final Cut hasn't finished using that device for source media.
Wait for copying to finish in Window, then Background Tasks. A trailer and a full interview can reference the same source file from separate libraries. Consolidating the interview doesn't relocate the trailer's references, so inspect both before erasing their shared recording drive.
To check the saved camera originals rather than proxies, select a clip in the browser and choose File, then Reveal in Finder. Check the drive containing the revealed file, not just its filename. Reveal Proxy Media in Finder checks a different file.
After copying finishes, quit Final Cut, eject the recording SSD, and reopen the library without it connected. Select the library and open File, then Relink Files, then Original Media. Missing entries here need investigation even if the timeline plays.
Suppose the interview opens normally, but its original appears as missing after you disconnect the SSD. The proxy still plays, while the original file is unavailable to the edit. Reconnect the untouched drive, copy the original to permanent storage, and relink to that copy before testing again.
Treat this as a check for missing links, not proof that every copied file is intact. Compare the saved files with the recording drive, checking counts and sizes, and inspect the footage. Keep the capture drive unchanged while you resolve any discrepancy.
Check the recording drive itself for folders from earlier sessions, not just the clips in today's library. A clean missing-media window only describes the library you selected. It cannot report an older recording that was never imported there.
Make a second copy of the originals on separate storage, alongside a backup of the library. When you manually copy a library with external media, include its media folder too. Copying the library file alone preserves references to those external files, not another set of recordings.
A second folder on the same editing drive doesn't protect against that drive failing. Put the extra copy on another physical device, so erasing the recording SSD doesn't leave only one surviving set of originals.
Apple tells you to reformat external storage before every 4K120 ProRes recording session. Footage imported from a Lexar Muse recording drive may still exist only on that SSD.
Keep the originals elsewhere, confirm Final Cut uses those copies, and make a separate backup before reformatting. A successful import, by itself, doesn't establish any of those things.
Imported clips can still depend on the recording drive
Choosing Leave files in place during import tells Final Cut to reference the existing files rather than duplicate them. Your interview can appear in the browser and timeline without its originals ever leaving the recording SSD.Even choosing Copy to Library needs a location check. Copies placed on the same recording SSD disappear along with the source files when you erase that device, regardless of their folder names.
The recording drive and the library drive also have different formatting requirements. Apple's Camera app requires exFAT for external ProRes recording, while Apple specifies APFS for an external drive holding a Final Cut library.
Keep the library on your Mac or a separate, appropriately formatted editing drive. Reformatting the capture SSD to suit Final Cut's library storage would conflict with the Camera app's recording requirement.
A new destination leaves existing footage behind
Select the library in Final Cut Pro on your Mac and open File, then Library Properties. Under Modify Settings, set Media to a folder on your Mac or a separate editing drive.Don't stop at the new destination name. The change applies to future imports, while existing source files stay where they were. Choose File, then Consolidate Library Media, and include original media in the transfer.
Choose the whole library when you need unused takes as well as the clips in the finished project. Selecting one project limits the operation to that project's media.
A "nothing to consolidate" message isn't proof that the SSD is ready to erase. It means the media is already gathered in one location. You still have to check which device holds it.
The storage-use breakdown in Library Properties lists the devices holding original, optimized, and proxy media. If originals still appear under the capture drive, Final Cut hasn't finished using that device for source media.
Wait for copying to finish in Window, then Background Tasks. A trailer and a full interview can reference the same source file from separate libraries. Consolidating the interview doesn't relocate the trailer's references, so inspect both before erasing their shared recording drive.
A playing timeline can conceal missing originals
Proxy media lets you edit without the original camera files present. Switching to Optimized/Original isn't a conclusive test either, because Final Cut uses optimized files when those are available.To check the saved camera originals rather than proxies, select a clip in the browser and choose File, then Reveal in Finder. Check the drive containing the revealed file, not just its filename. Reveal Proxy Media in Finder checks a different file.
After copying finishes, quit Final Cut, eject the recording SSD, and reopen the library without it connected. Select the library and open File, then Relink Files, then Original Media. Missing entries here need investigation even if the timeline plays.
Suppose the interview opens normally, but its original appears as missing after you disconnect the SSD. The proxy still plays, while the original file is unavailable to the edit. Reconnect the untouched drive, copy the original to permanent storage, and relink to that copy before testing again.
Treat this as a check for missing links, not proof that every copied file is intact. Compare the saved files with the recording drive, checking counts and sizes, and inspect the footage. Keep the capture drive unchanged while you resolve any discrepancy.
Check the recording drive itself for folders from earlier sessions, not just the clips in today's library. A clean missing-media window only describes the library you selected. It cannot report an older recording that was never imported there.
Make a second copy of the originals on separate storage, alongside a backup of the library. When you manually copy a library with external media, include its media folder too. Copying the library file alone preserves references to those external files, not another set of recordings.
A second folder on the same editing drive doesn't protect against that drive failing. Put the extra copy on another physical device, so erasing the recording SSD doesn't leave only one surviving set of originals.