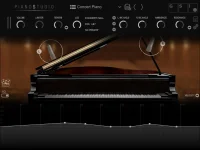
GSi Piano Studio includes 12 virtual microphones and nine preamp types, creating more than a hundred possible pairings before ambience enters the picture. Version 1.1.0 made GSi Piano Studio's microphone and preamp responses more distinct, so casual preset hopping now throws bigger tonal changes at you. More choice helps only when you can hear what changed.
Start with a short MIDI performance instead of replaying the part for every comparison. Use low notes, exposed midrange chords, hard accents, soft notes, and enough sustain to hear the decay. Keep the piano model, velocity curve, ambience, EQ, delay, reverb, and limiter unchanged so your hands stop being another variable.
Keep playback level as close as possible between choices. Louder can seem clearer, fuller, and more exciting, so trim monitoring or output until the candidates sit at comparable loudness. You are judging character, not rewarding whichever setting shouts first.
Real grand pianos do not radiate every frequency evenly, and reflective rooms complicate the picture. Research using more than 1,300 measurement points found meaningful instrument-room interaction, making grand piano radiation in reflective rooms useful context for virtual microphone decisions. A virtual mic need not imitate one literal stand position, so judge tonal balance across the keyboard rather than one flattering band.
Use the same MIDI passage and narrow the 12 choices to two or three that solve a real job. A dense pop mix may reward a tighter, more forward piano that leaves less low-mid fog, while a sparse ballad can tolerate more body and depth. Solo playing is different again because no vocal, bass, or guitar is competing for the same space.
Do not change EQ while auditioning preamps. If one preamp seems too dark and you immediately add top end, you have stopped comparing preamps and started comparing processing chains. Save corrective EQ for later, after you know which raw pairing gives you the most useful starting point.
The same restraint applies to ambience and reverb. Piano Studio offers six ambience selections plus delay and reverb, but added space can blur attack and decay differences. Keep the space constant, choose the capture character, then decide how much environment the track needs.
A useful second pass is to reverse the test once your favorite pairing emerges. Keep the chosen preamp fixed, revisit the nearest two microphone alternatives, and check whether your original winner still holds up at matched level. If it does, you probably chose a complementary combination rather than a preamp that rescued a weak microphone choice.
Reset to your original reference every few swaps. Cycling through nine preamps without a baseline quickly turns the middle choices into a blur, while the last option you heard can become the comparison point by accident.
Check the quietest and busiest sections separately. One pairing may suit exposed verses but turn brittle in hard choruses, while another may sit under a vocal yet lose definition in solo passages. The useful choice survives both ends of the song without demanding a rescue operation from EQ or compression.
Save the winning setup as a program with a name tied to its function, not vague praise. Names such as intimate vocal bed, bright dense chorus, or wide solo piano tell you why it exists weeks later. Keep one alternate for a different arrangement because changing the virtual recording chain is cleaner than rescuing a bad source tone.
Start with a short MIDI performance instead of replaying the part for every comparison. Use low notes, exposed midrange chords, hard accents, soft notes, and enough sustain to hear the decay. Keep the piano model, velocity curve, ambience, EQ, delay, reverb, and limiter unchanged so your hands stop being another variable.
Virtual microphone choice should come before preamp color
Pick the microphone first and leave the preamp on one neutral or familiar setting while you compare it. Listen for attack versus body, bass weight, upper-mid presence, stereo width, and how the decay sits behind the strike. Avoid deciding after two loud chords because a microphone character that dazzles briefly can become tiring across a full arrangement.Keep playback level as close as possible between choices. Louder can seem clearer, fuller, and more exciting, so trim monitoring or output until the candidates sit at comparable loudness. You are judging character, not rewarding whichever setting shouts first.
Real grand pianos do not radiate every frequency evenly, and reflective rooms complicate the picture. Research using more than 1,300 measurement points found meaningful instrument-room interaction, making grand piano radiation in reflective rooms useful context for virtual microphone decisions. A virtual mic need not imitate one literal stand position, so judge tonal balance across the keyboard rather than one flattering band.
Use the same MIDI passage and narrow the 12 choices to two or three that solve a real job. A dense pop mix may reward a tighter, more forward piano that leaves less low-mid fog, while a sparse ballad can tolerate more body and depth. Solo playing is different again because no vocal, bass, or guitar is competing for the same space.
Preamp choices make more sense after the mic is settled
Once the microphone choice feels right, keep it fixed and cycle through the nine preamp types. Focus on changes in edge, density, low-end firmness, apparent brightness, and how strong notes behave beside quieter ones. Small color differences matter more than dramatic novelty, especially if the piano already fits the track.Do not change EQ while auditioning preamps. If one preamp seems too dark and you immediately add top end, you have stopped comparing preamps and started comparing processing chains. Save corrective EQ for later, after you know which raw pairing gives you the most useful starting point.
The same restraint applies to ambience and reverb. Piano Studio offers six ambience selections plus delay and reverb, but added space can blur attack and decay differences. Keep the space constant, choose the capture character, then decide how much environment the track needs.
A useful second pass is to reverse the test once your favorite pairing emerges. Keep the chosen preamp fixed, revisit the nearest two microphone alternatives, and check whether your original winner still holds up at matched level. If it does, you probably chose a complementary combination rather than a preamp that rescued a weak microphone choice.
Reset to your original reference every few swaps. Cycling through nine preamps without a baseline quickly turns the middle choices into a blur, while the last option you heard can become the comparison point by accident.
The best pairing survives the arrangement
A piano sound judged alone can be wonderfully rich and still occupy too much room once bass, vocals, drums, and guitars arrive. Audition the final two pairings inside the mix at normal level, then mute the piano briefly and bring it back unchanged. Listen for whether the instrument fills a useful space or simply makes the mix thicker.Check the quietest and busiest sections separately. One pairing may suit exposed verses but turn brittle in hard choruses, while another may sit under a vocal yet lose definition in solo passages. The useful choice survives both ends of the song without demanding a rescue operation from EQ or compression.
Save the winning setup as a program with a name tied to its function, not vague praise. Names such as intimate vocal bed, bright dense chorus, or wide solo piano tell you why it exists weeks later. Keep one alternate for a different arrangement because changing the virtual recording chain is cleaner than rescuing a bad source tone.